V3mail release 1.2
Video Window
Documentation Home | F.A.Q. | Troubleshooting
![]() If you have a Video for Windows compatible PC
video capture device installed on your system you can click on the Video message icon in
the toolbar of the main window. The Video window is used to record your Video
message or to take a snapshot. It automatically compresses the video file or
snapshot when attached.
If you have a Video for Windows compatible PC
video capture device installed on your system you can click on the Video message icon in
the toolbar of the main window. The Video window is used to record your Video
message or to take a snapshot. It automatically compresses the video file or
snapshot when attached.

fig 1 Video Window
Video Recording
1. Start Recording
Click on the Rec button to start the recording. ![]() The
total time and size of the voice recording will updated while recording.
The
total time and size of the voice recording will updated while recording.
2. Stop recording
Click on the Stop button to stop the recording.
3. Attach the Video message
Click on the Attach button to close the Video window and attach the video message.
4. Rename the video message file (*registered version only)
Click in the filename: field and type the name you want to give the video message.
5. Attach multiple video messages (*registered version only)
You will also be able to attach multiple video messages whether or not you rename the files. The program will automatically assign a unique filename for every attachment.
Video Snapshot
If you decide to create a snapshot instead of recording a video
1. Take Snapshot
Click on the Camera button. ![]() You can retake the photo as
many times as necessary. The photo can be previewed in the preview window.
Click the Stop button to stop preview mode and return to live preview mode.
You can retake the photo as
many times as necessary. The photo can be previewed in the preview window.
Click the Stop button to stop preview mode and return to live preview mode.
2. Attach the Snapshot
Click on the Attach button to close the Video window and attach the snapshot.
3. Rename the snapshot file (*registered version only)
Click in the filename: field and type the name you want to give the snapshot.
4. Attach multiple snapshots (*registered version only)
You will also be able to attach multiple snapshots whether or not you rename the files. The program will automatically assign a unique filename for every attachment.
Click the Codec button to open the Video COder DECoder (CODEC) window. This window will allow you to change the compressor & quality of compression (0 - 100) used in reducing the filesize of the video message. (*NOTE: the compressors listed are codecs which are installed on your computer system and may not be present on the recipients system, which may render the video message unplayable by the recipient. However the compressor used by default is installed on all Windows systems so it will always be playable by the recipient) When in doubt, let the program use the default compressor.

fig 2 Codec window
The format window is used to change the resolution & color depth of the Video message. The resolutions available to you will depend on the video capture device installed on your system & selected in the program. Also, this window will vary among different video devices since the video device manufacturer is responsible for creating the Format window. The screenshot below is used only as an example.

fig 3 Format window
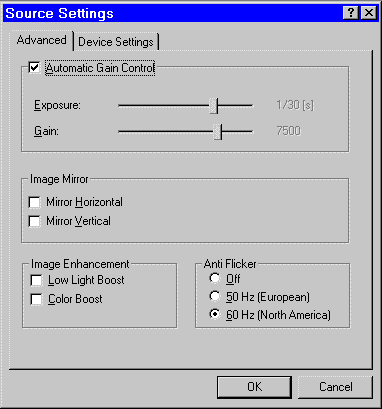
The source window's purpose varies among video capture devices. Like the format window above, this window is developed by the video device manufacturer. For most PC cameras you can adjust the quality of the video picture. In video capture card devices you can additionaly select the video source. The screenshot below is used only as an example.

fig 4 Source window